How To Use Your Sous Chef Whetstone


This step-by-step guide shows you exactly how to set up and use your combination whetstone (sometimes called a water stone), so you can confidently sharpen your knives at home. Watch the video below, then follow the written steps if you’d like a quick reference while you work.
For more knife care tips head to our Kitchen Knife Guide, or read more about the best kitchen knives to buy.
Watch: How to Sharpen Your Knife with Your Whetstone
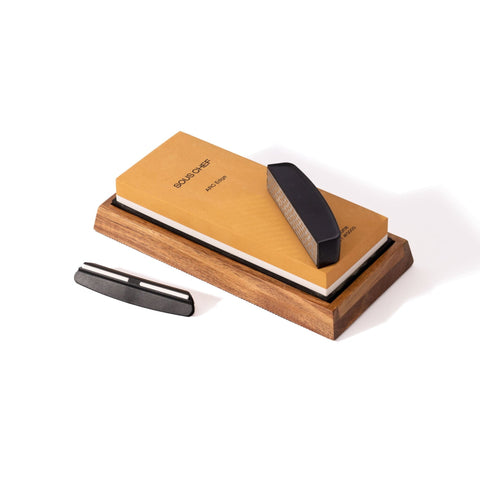
What’s Included in Your Whetstone Set
Inside the box you’ll find:
- Combination whetstone (1000 / 5000 grit)
- Rubber base
- Wooden holder with non-slip base
- Angle guide
- Stone flattener
Before You Start: Soak the Stone
Remove the whetstone from the box, submerge it fully in water. Soak for 5–10 minutes before use.
The stone should be fully saturated before sharpening. Keep a little water nearby while you work and re-wet the surface if it starts to dry out.
Step 1: Assemble the Base
-
Place the rubber base inside the wooden holder. Set the whetstone securely on top. Ensure everything is stable on your countertop. The non-slip base keeps the stone steady while you sharpen, stability is key for safety and consistency.
Step 2: Choose Your Grit
Your stone has two sides:
- 1000 grit, for dull or blunt knives. This is your most powerful sharpening side.
- 5000 grit, for refining and polishing the edge to razor sharpness.
If your knife is very blunt, always start with the 1000 grit side. Finish on the 5000 grit side for a clean, refined edge.
Step 3: Attach the Angle Guide
If you’re new to sharpening, use the angle guide.
-
Slide the angle guide onto the spine (back edge) of your knife.
-
Rest the knife against the stone.
This ensures you maintain the correct sharpening angle throughout. The white strips on the guide help the blade glide smoothly over the stone.
Consistency matters more than pressure.
Step 4: Sharpening Technique
- Place the blade against the stone at the correct angle. Move the knife back and forth across the stone. Work evenly along the blade, moving the angle guide down as you go.
-
Do 5-6 strokes on one side. Flip the knife. Repeat 5-6 strokes on the other side. Keep your stroke count even on both sides. This helps maintain a balanced edge. Use steady, controlled movements, don’t rush.
Step 5: Test the Sharpness
- Once you’ve worked both sides, carefully test the knife. A tomato is a good indication - a sharp knife should glide through the skin without pressure. If needed, repeat the process, then finish on the 5000 grit side for that final sharp edge.
Step 6: Clean Your Knife
- After sharpening, rinse and wipe down the blade thoroughly. Remove any residue from the surface. You may notice slight markings on the blade over time — this is completely normal.
Maintaining Your Whetstone
Over time, whetstones can become uneven from repeated use.
That’s where the stone flattener comes in:
- Wet the stone. Rub the flattener back and forth across the surface. Continue until the stone is level again. A flat surface ensures consistent sharpening every time.
A Few Pro Tips
-
Keep the stone wet while sharpening.
-
Let the stone do the work; excessive pressure isn’t necessary.
-
Always sharpen on a stable surface.
-
Avoid using this whetstone on serrated knives.
-
Dry your stone thoroughly before storing.
A properly sharpened knife isn’t just more satisfying to use, it’s safer, more precise, and makes cooking far more enjoyable. If you sharpen regularly, your knives will reward you for years.
For more knife care tips head to our Kitchen Knife Guide, or read more about the best kitchen knives to buy.