


Getting started with your ProQ BBQ Smoker
by The Sous Chef Team


This guide will help you understand how to use your ProQ BBQ smoker. From lighting it to setting it up for different cooking conditions.
Watch the ProQ in action, and see why so many pros and BBQ experts choose these 3-in-1 BBQ Smokers.
- Learn how to light your BBQ Smoker,
- how to assemble the ProQ BBQ
- What type of BBQ fuel to use
- Why you should use a water pan in your ProQ
- What temperature you should BBQ at
Should I buy a ProQ?
Expert BBQ chef Jenny Greenhalgh explains why she loves the ProQ 3-in-1 BBQ Smoker - and exactly how to get the very best from it.
Watch her 10-minute video above to understand: What makes this BBQ different to others. Which fuel works best on a ProQ. How is BBQ smoking different to flame grilling? What to cook first on your ProQ.
1. How to light your BBQ
Chimney Starter - The fastest way to get your fire going.
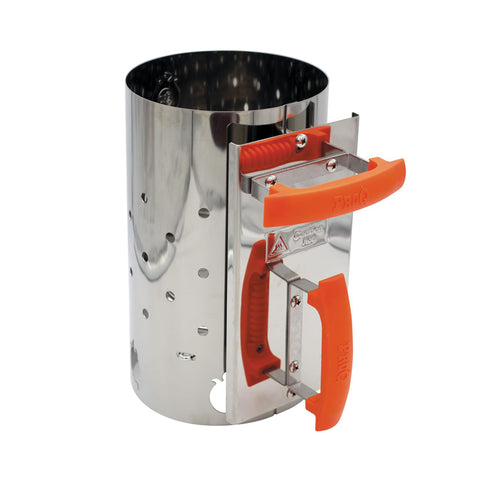
BBQ Chimney Starter, 27cm high x 16cm dia
BBQ Chimney Starter, 27cm high x 16cm dia
- Open all the vents in the base. Take 2-3 fire lighters (or a couple sheets of scrunched up newspaper), place them in the charcoal basket light them.
- Put your chimney starter above the fire lighters, fill with good quality lumpwood charcoal or briquettes and give it 10-15 minutes to get going.
- Once you see flames coming out the top of the chimney and your coals are turning white, carefully pour your lit fuel into the centre of the charcoal basket using some good quality BBQ mitts.
Under The Basket – Perfect in a pinch
- Take 2-3 fire lighters (or a couple sheets of scrunched up newspaper), place them in the base of the BBQ beneath the charcoal basket & light them. Open all the vents in the base.
- Add a big double handful of good quality lumpwood charcoal or briquettes to the basket above the firelighters and give it 15-20 minutes to get going.
- Once you see flames and your coals are turning white, top up your charcoal basket with unlit fuel & give the fire 5 more minutes to catch before setting up the smoker to cook.
Tips
- Always open your bottom vents when lighting a fire, this will ensure the fire has as much oxygen as possible, and will reduce the smoke created.
- If your fire is lighting slowly, you can add a couple more fire lighters or sheets of newspaper once they’ve burned out.
2. Choosing your fuel
Using good quality lumpwood charcoal or briquettes is the key to a good fire. We recommend our premium Cocoshell Briquettes, restaurant grade lumpwood charcoal, or a combination of the two.
Lumpwood
Lumpwood charcoal comes in various forms, but for BBQ, we recommend “restaurant grade”. These usually come in bigger chunks that give you a better & more consistent burn. Avoid anything that’s labelled “instant light”, as these fuels are impregnated with accelerants like paraffin and other chemicals that can taint the flavour of your food.
- Lighting Time: 10-15 Minutes
- Burn Time: 2-10 Hours
- Burn Temp: Medium
Good lumpwood is 100% natural carbonized wood, it lights & burns faster than most briquettes, making it ideal for shorter cooks, but it works ok for longer ones too. During handling it can easily break down into small pieces and dust that can reduce airflow resulting in a slow burning fire. Sometimes these unevenly sized pieces can create spikes or drops in cooking temperature which can lead to varying results.
Briquettes
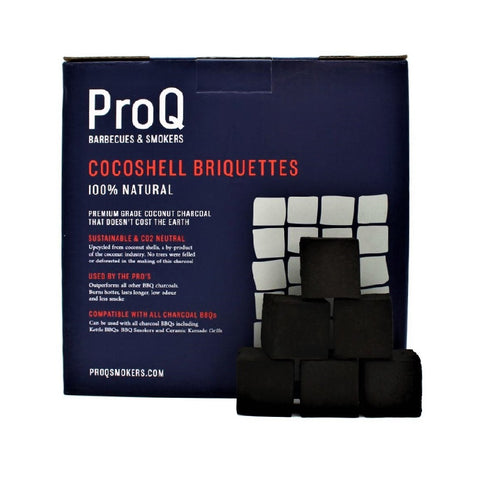
ProQ Cocoshell Briquettes, 10kg
ProQ Cocoshell Briquettes, 10kg
We highly recommend our ProQ Cocoshell Briquettes which are an all-natural, high-performance fuel suitable for all outdoor cooking. The quality of available briquettes can vary hugely, which can lead to varying results depending on brand. The same applies to lumpwood charcoal, we’d avoid anything that’s labelled “instant light” due to the accelerant chemicals used.
- Lighting Time: 15-20 Minutes
- Burn Time: 4-12 Hours
- Burn Temp: Hot
ProQ coconut charcoal is upcycled from coconut husks, a by-product of the coconut industry. It is widely acknowledged as being more sustainable and better for the environment than normal wood-based charcoal. It burns hotter, cooks cleaner & lasts longer than ordinary lumpwood charcoal and briquettes.
Smoking Woods
The basic rule of thumb is that wood chips are good for shorter cooks, whilst wood chunks are better for longer cooks.
Fruit woods work well with more delicate dishes like fish or veggies, and other woods like oak or hickory work better with more robust flavours like beef – but don’t let that put you off experimenting!
When choosing woods, it’s best to buy wood specifically sold for food smoking, this avoids any risk of impurities, like chainsaw oil for example.
Browse all Smoking wood and chips
Chips
Chips produce a lot of smoke in a short amount of time, making them perfect for quicker cooks or adding some smoke whilst you’re grilling. Use a smoker box (or make a foil pouch) to get the most out of your wood chips. We’d recommend no more than 1-2 handfuls of chips per cook, but you can add more if you prefer a heavier smoke.
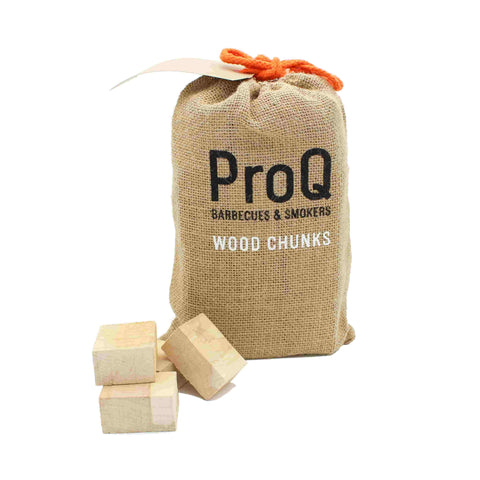
Chunks
Chunks are a slow-release smoke source, perfect for longer BBQ or “Low’n Slow” cooks. 1-2 fist sized chunks will produce an ideal amount of smoke for around half an hour. After putting your food on the grill, add your chunks to the hottest part of the fire for the best results. Once your chunks have burned out, you can always add a couple more.
Tips
- Using the best features from different BBQ fuels can be advantageous, for example, you can light some lumpwood (faster lighting) and then add Cocoshell Briquettes as the main fuel for the fire (longer burn time).
- Think of smoke like a seasoning, you can always add more, but you can’t reduce it once it’s on. Try a lighter smoke and add more to taste on your next cook.
- Ideally you should be aiming for less smoke over a longer time, this will avoid acrid flavours and give you better results.
3. BBQ Configurations
Setting up for grilling
Grilling is a timeless method of cooking – just food & fire. It’s defined really by direct heat as there is no baffle or barrier between the fire & the food.
Grilling can be done at a lot of different temperatures so consider the thickness of what you’re cooking and adjust accordingly. Thinner, faster cooking food like seafood can take a higher temperature, whilst things like bone in chicken may need a lower grilling temperature to ensure they cook through completely.
- Light your fire using one of the fire lighting methods we described above, adding unlit fuel to top up the charcoal basket & open all the vents in the base of the smoker.
- Once the charcoal or briquettes are lit & turning grey, add a single stacker with a grill & the lid with that vent open too. You can cook without a stacker but adding it will give you more control over the temperature.
- After 10 minutes, check the temperature on the lid gauge. You’re aiming for between 350-480°F/180-250°C. To bring the temperature down, close the vents in the base slightly, try a quarter closed, then a half if needed.
Other ways to setup your BBQ smoker as a grill include lighting a smaller fire in one half of the charcoal basket with a grill directly on top and the lid. This allows you to have a hot and a cool zone for cooking and makes the BBQ a bit more portable. By adding 2 stackers and cooking on the top level only, you can grill a whole spatchcock chicken in around 45 minutes.
Tips
- After each vent adjustment, give the smoker around 10 minutes to react to the change.
- Use the lid when grilling – this helps to keep the fire under control, adds convectional heat for even cooking and will reduce any flare-ups.
- Similar to indoor cooking, grilling is great when you need to sear something quickly without drying out the food.
Setting up for roasting
BBQ-Roasting is a game changer, you can cook anything you’d normally cook in the oven on our smokers but with the added flavour of cooking over a fire.
- Light your fire using one of the fire lighting methods we described above, adding unlit fuel to top the charcoal basket up & open all the vents in the base of the smoker. Give the fire 10 minutes or so to catch.
- Tightly foil over an empty waterpan, or see Video 12 for options on dry baffles and place it in a stacker over the fire. You can add a second stacker & grill if needed and then the lid with the vent open.
- After 10 minutes, check the temperature on the lid gauge. You’re aiming for between 350-400°F/180-200°C. To bring the temperature down, close the vents in the base slightly, try a quarter closed, then a half if needed.
Roasting on a BBQ is a fantastic way to cook anything you’d normally cook indoors. Try pies, large cuts of meat or even desserts!
Tips
After each vent adjustment, give the smoker around 10 minutes to react to the change.
Setting up for BBQ Smoking
The classic American BBQ setup, perfect for cooking cuts like pork shoulder, brisket & ribs low’n slow style. This method allows meat to become perfectly tender and some real smoky flavours to develop.
- Light your fire using one of the fire lighting methods we describe above, adding unlit fuel to top the charcoal basket up & open all the vents in the base of the smoker. Give the fire 10 minutes or so to catch.
- Place a stacker over the fire, with the water pan in place, pour in 4L of very hot water and add a grill above the pan. Add a second stacker & grill if needed and then the lid with the vent open.
- After 15 minutes, check the temperature on the lid gauge, you’re aiming for between 220-250°F/104-120°C. With water in the pan, the smoker won’t overheat so there’s no need to worry.
- Once your food is on the BBQ, add some smoky flavour with some wood chunks or chips.
Low’n Slow is a traditional method that helps to break down connective tissue & render fat for beautiful results from usually tough cuts of meat. Similar results can be achieved at higher temperatures (Hot & Fast BBQ) - you can follow the setup guide for roasting to do that. Aim for 300-350°F /150-175°C and spritz your meat with water or fruit juice every couple of hours to make up for the lack of moisture.
Tips
- After each vent adjustment, give the smoker around 10 minutes to react to the change.
- The water in the pan will act as a heat sink, and as long as there is water in the pan, it will stop the temperature rising much over 110°C/225°F.
- The same temperatures can be achieved without water in the pan.
- Improve fuel efficiency by starting with all 4 vents open and just closing off the bottom vent below the door once you’ve reached your desired temperature - this will also give you longer smoke from your wood chunks.
- Once your food is on the BBQ, add some smoky flavour with some wood chunks or chips.
Want to learn more? We recommend the below articles to help you get started with smoking or BBQ


About the author
The Sous Chef team spends all day, every day hunting out the most exciting flavours, trends and recipes from across the world.
Every single team member tastes ingredients weekly, and cooks with the most up-to-date and classic cooking tools regularly. We're experts in ingredients and cookware from around the world.
We are constantly tasting new products, trying new recipes, and speaking to expert producers. For recipes and inspiration from the Sous Chef team, sign up for emails here.


