How To Make Pasta Without a Pasta Machine
By Giovanna Ryan
-
Easy
Handmade pasta is wildly satisfying to make but if you’re short on space or don’t want to spend the money on a machine, there are plenty of pasta shapes that you can make with little or no equipment. Even if you have a machine, I highly recommend that you get involved with some of these as it feels like a more creative process and all quite simple once you get the hang of them. There’s no escaping the fact that handmade pasta is relatively time consuming, even with a machine, and hand shaping does take a while. However, like many cooking processes, it can be very meditative, especially once you get into a rhythm.
There are hundreds of regional pasta shapes plus numerous variations that hail from all over Italy. Very generally, the pasta that is still made by hand tends to originate from the southern regions, although there are, of course exceptions. The semola and water dough used in three out of the five pasta shapes below is typical of the south as eggs were considered expensive and an ingredient only afforded by the more affluent northern regions.
Each pasta shape is designed to be a vessel for a particular type of sauce and I’ve made some suggestions. However, I really encourage you to experiment with different shapes and sauces as this is the beauty of making pasta yourself.
The homemade pasta dough

Most hand-shaped pasta uses a semola flour or "semolina rimancinata" (fine ground semolina) and water dough with a ratio of 1:2 water to flour.
- The semola dough is sturdier than 00 flour dough, so is easier to manipulate and holds its shape better.
- Hand rolled pappardelle, however, is made with an egg and 00 flour dough, and
- pici are made with a 00/semola mix plus water.
Each dough is made using the same basic method. However, flour can be fickle and quantities may vary according to temperature, humidity and other outside factors and egg pasta will depend on the size of your eggs which can vary quite wildly.
The key is not to add extra liquid until you’ve given the dough a good knead for a few minutes.
I’m repeatedly fascinated at how a shaggy, dry-looking mixture can turn into a smooth silky dough after a few minutes of kneading. If it’s still too dry after kneading for a while, add water very gradually by wetting your hands and kneading until you have the consistency you want. I would always err on the dryer rather than the wetter side for pasta making.
It should be soft, but not sticky, so if you find yourself with a damp dough, sparingly flour your work surface and knead to incorporate. It is vital that you rest all pasta dough for around 30 minutes in something airtight to allow the flour to continue to hydrate and for the gluten to relax ready for shaping.
The quantities for each dough serve four as a standard pasta course.
How long should I cook homemade pasta for?
The general rule that I use for cooking handmade pasta shapes is to look out for when they float to the surface, plus a minute or so.
You should always test a piece before draining. It should feel bouncy, not squishy and the raw flour taste should have been eliminated. The pasta should always be cooked in it’s sauce for a minute before serving.
Semola dough (Cavatelli, Orechiette and Busiate)
- 400g semola flour
- 200g water
00/semola dough (Pici)
- 200g semola flour
- 200g 00 flour
- 200g water
Egg pasta dough (Pappardelle)
- 400g 00 flour
- 4 large eggs, beaten
How to make the pasta dough
- Tip the flour or flours out onto a clean, dry work surface, preferably wooden. The grain of the wood will do some of the work for you when kneading and shaping the dough.
- If using two different types of flour, mix to incorporate then make a large well in the centre of the flour, either with your hands or with the bottom of a bowl.
- Pour in the liquid and use a fork to gradually incorporate the flour from the outside into the liquid in the centre.
- Once it’s mostly incorporated, bring together into a dough and knead for around 10 minutes until you have a smooth, silky dough that is soft to the touch.
- Leave the dough to rest for 30 minutes wrapped in cling film or another airtight container.
Top tips for shaping your pasta
- Work in batches and keep the rest of your dough wrapped up or in an airtight container. Very dry dough is difficult to work with as it can’t stick to whatever surface you’re using to shape it.
- Similarly, work on a clean, dry surface and don’t dust with flour or semolina. Flour will stop the dough being able to hold onto the surface and you won’t be able to shape it.
- Working on a wooden surface will help provide the friction that you need to manipulate the dough into beautiful shapes. A wooden chopping board is ideal.
- Once shaped, keep at room temperature on a tray or board dusted with semolina whilst you shape the rest of the dough. Ideally avoid using semola or other flour as, when you come to cooking, it will stick to the pasta and form a gluey film, whereas semolina will fall off into the pasta water.
- If you don’t want to eat it that day, store the shaped pasta in the freezer. You can cook it directly from frozen, just add a couple of minutes to the cooking time. Fresh pasta doesn’t keep much longer than a day in the fridge before it starts to discolour.
How to make orechiette pasta
These “little ears” originate from Apulia, right on the heel of the Italian boot. If you visit the region, you will likely see orecchiette being shaped in kitchens open to the street and dried out in the hot, southern sun.
Like other "dragged" pasta shapes, orecchiette really benefit from being shaped on wood. The relative warmth and friction provided by the slightly rough surface helps to create the resistance needed to create their signature shape.
All you need to shape these is a standard dinner knife.
What sauce should I use with Orecchiette?
Orecchiette are traditionally served with vegetable-based sauces, most commonly cime di rapa, friarelli or turnip tops. You can also achieve a similar sauce with broccoli (see recipe further down the page).
Cook broccoli until soft then pair with anchovies, chilli flakes and lots of olive oil and serve with pangrattato (crispy breadcrumbs).
To shape
- Cut a slice of around ⅕ of your dough and roll into a long sausage around 2cm wide. Keep the rest of the dough wrapped up while you work.
- Cut the sausage into ½ cm pieces.
- Place one of the pieces in front of you and, using the flat of a butter knife, press down and drag the knife towards you so it forms a curled up oval shape.
- Place the oval over your thumb or finger and pull down so it turns inside out and makes an ear shape.
- Repeat with the remaining dough.
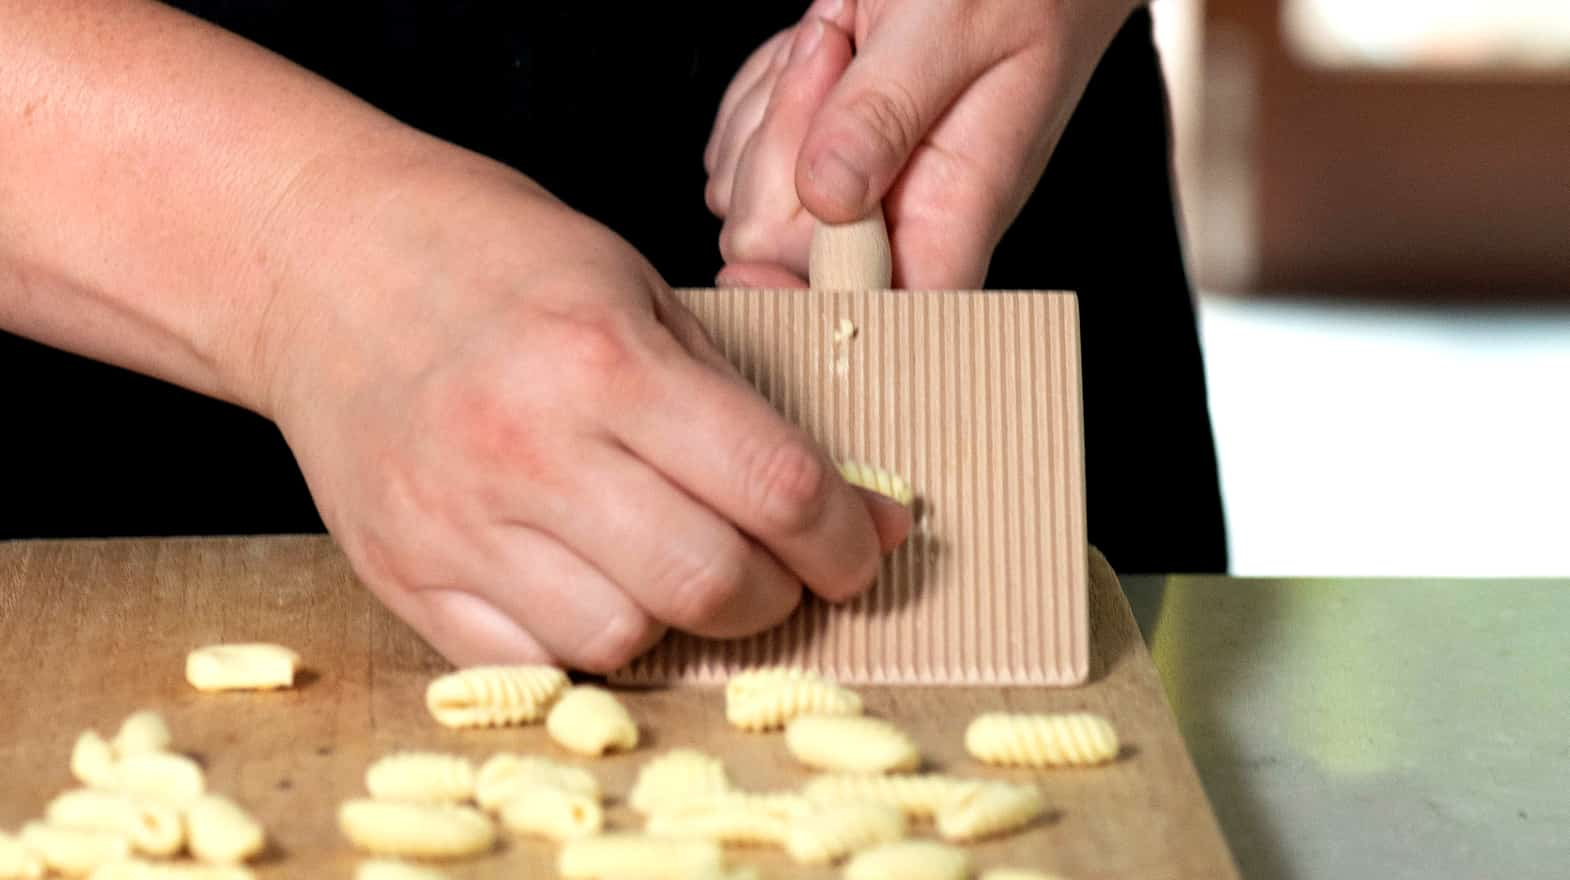
How to make cavatelli pasta
These are my favourite pasta shapes to make because I find their little ridges so very satisfying.
The method I’ve outlined here uses a gnocchi board but you can use a fork, a serrated knife or any rough surface to create their signature ridges and little inside pocket which are so excellent at holding sauce. Cavatelli originates from Molise, but versions of this shape exist across southern Italy.
What sauce should I serve with cavatelli?
The sauce should be such that it can infiltrate the little hollow created by your thumb so something that is relatively fine in texture works best.
My favourite is a rich sausage and fennel ragu where the sausage meat has been well broken down.
To shape
- Cut a thick slice from your dough and keep the rest in something airtight whilst you work. Roll into a long sausage shape around 1cm thick.
- Cut the sausage into ½ cm pieces. You want to work with slightly smaller pieces than when making orecchiette.
- Hold the handle of a gnocchi board in your non-dominant hand and angle it downwards. Take one of the pieces of cut dough and drag it downwards so that it creates ridges and curls up. You need to press down relatively firmly.
- Repeat with the remaining dough.
Busiate
These twirly, ribbon-like shapes are probably the trickiest to master, but once you’ve got the hang of them, you’ll be rewarded with a pile of delightful little ringlets.
To make busiate, you need a long thin skewer-like object. In fact, the name comes from the word busa meaning reed which was traditionally used to create the corkscrew-like shape.
There is an instrument called a ferretto which you can buy but I wouldn’t bother.
The best thing I’ve found to make it is a strand of dried bucatini. It’s the perfect size, and it doesn’t stick to the dough. In the absence of bucatini, a round, thin skewer is ideal.
What sauce should I serve with busiate?
Busiate hails from Trapani in Sicily so it would be remiss of me not to suggest pairing it with Pesto alla Trapanese, a tomato, basil and almond pesto from the region.
To shape
- Cut a piece of dough around 60g and keep the rest wrapped up. Roll the piece out into a rough rectangle about ½ cm thick and cut into strips around 1cm wide.
- Take one of the strips and roll into a thin sausage. Cut this into lengths of around 10 cm.
- Place one of the lengths vertically on your board. Take your stick and place at the top of the length at around a 45 degree angle to the dough.
- Pressing down gently, roll the stick towards you, catching the top with your forefinger so that the strip rolls up along the length of the stick.
- Roll against the board a couple of times then gently slide off the stick.
- Repeat with the remaining dough.
How to make pici
I can’t help thinking of Roald Dahl’s The Twits when making pici.
They have a distinctive worm-like aesthetic to them, but don’t let that put you off! Pici are formed by rolling strands of soft dough into thick lengths. Don’t aim for perfection here, the beauty of pici is in their irregularity.
To shape the pici dough
- Cut a piece of 00 flour and water dough around 60g and keep the rest wrapped up. Roll the piece out into a rough circle about ½ cm thick and cut into strips around 1cm wide.
- Take one piece at a time and using both hands in an outward motion, roll into thick strands.
- Repeat with the rest of the pieces then dust with semolina and curl up into a nest to store whilst you shape the rest of the dough.
How to make hand-rolled pappardelle
Full disclosure. If you have a pasta machine, it is much easier to make the sheets of pasta for pappardelle using the rollers before cutting than doing it by hand.
However, if you don’t, you can achieve pappardelle perfection with a rolling pin and a little extra elbow grease. These thick strands of silky rich egg pasta are made for mopping up slow-cooked meaty tomato ragu sauces.
You can, of course, apply the same technique for making any long, flat pasta, just adjust your cutting width accordingly.
To shape
- Cut your egg pasta dough into 4 pieces and keep three wrapped up while you roll out the first.
- Flour your surface very sparingly and use a rolling pin to roll the pasta into a rough rectangle. You’re aiming for it to be slightly translucent.
- Roll up the sheet with the long side facing you and cut into pieces around 3cm wide.
- Unroll the sheet into thick lengths, dust with semolina and curl groups of three or 4 pieces up together into nests to store whilst you repeat the process with the rest of the dough.
Sauce for Orecchiette

Ingredients for brocolli and anchovy sauce
- 200g Broccoli
- 2 cloves of garlic
- Tin of Anchovies (4 or 5 anchovies)
How to cook
- Cook the broccoli until soft - boil in some water. Cut into rough heads so it will cook evenly. Falling apart a little bit into the sauce (more than tender).
- Finely slice the garlic and cook slowly with the anchovies in the oil from the tin. Fry the anchovies until dissolved. Add in the brocolli
- Scoop the orcchiette out of the pan with a little bit of water in the spoon and add to the pan
Sauce for cavatelli and busiate


Ingredients for simple tomato sauce
- Tin of San Marzano tomatoes
- Garlic cloves (minced)
- Olive Oil
How to cook simple tomato sauce
Pici sauce recipe

Pici are well-suited to a smooth sauce that will coat the soft strands of pasta. I love the simplicity of pici aglio e olio, a garlic and oil sauce where slices of garlic are cooked very gently in lots of olive oil, served with a generous helping of pangrattato. The contrast in textures between the crisp breadcrumbs and the soft, plump pasta is pleasing.
Ingredients for Aglio e Olio
- Minced garlic cloves
- Olive Oil
- Breadcrumbs
How to Cook
- Finely slice the garlic and cook slowly with in the oil.
- Scoop the Pici out of the pan with a little bit of water in the spoon and add to the pan
- Serve with some breadcrumbs
Feeling inspired? Learn how to use a ravioli tray next or shop our range of pasta making.


About the author
Giovanna Ryan was a Masterchef finalist in 2017 and is now a contributing food editor for House Beautiful UK. Born and raised in London, she comes from a family of foodies and is inspired by her Italian heritage. When she's not cooking up a storm in the kitchen she teaches classes for her business cook and feast.